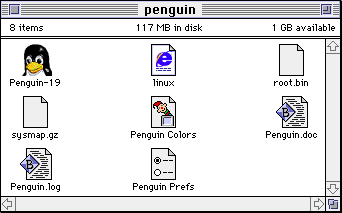
fig.1: The necessary files in one window.
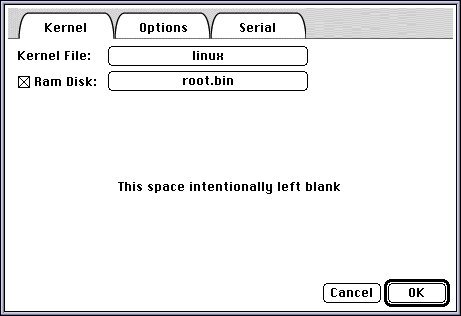
fig.2: The settings in the Penguin "Kernel" tab.
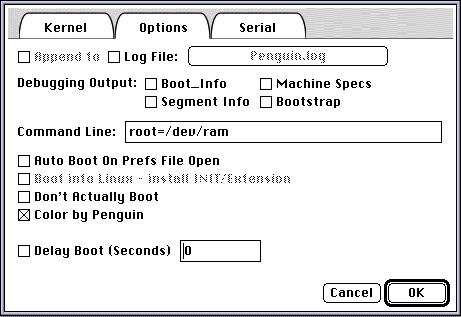
fig.3: The settings in the Penguin "Options" tab.
Version I, 17.08.2001.
This little essay documents my efforts in installing, configuring and running NetBsd on an 68k Macintosh. It's the result of the idea to avoid an 8 years old piece of industrial witchcraft from being dumped or becoming useless. In spite, my intention was to examine if this Macintosh that has become an unreliable beast using the most recent Mac OS versions could have a future as a Unix server.
I first tried the Debian Linux-m68k distribution with no success. Then I discovered NetBsd claiming that even this computer "of course it runs NetBsd".
And it was true: I should successfully install the operating system going through some awkward hard disk partitioning, and in the end be the proud administrator of a stable running *nix box. Compared to the poking aroung with Debian, it was an ease to go for NetBsd. This is probably due to the extensive documentation of both, the general NetBsd system as well as the specific issues of the mac68k distribution.
I certainly was too lazy to immediately write down everything I did. Anyway, this should not be an exact manual sufficient to clear any detail about installation and configuration of NetBsd, rather the description of my personal experience and also focusing only on the issues of this specific platform most of the time. Many things I had to write down from my memory which can be quite deceptive sometimes...
Moreover, I never intended to make a Linux-like consumer workstation out of the Performa, using KDE and whatever shnick-shnack you can imagine... No, I mean, exactly this was what the machine has been before and from there I wanted it to advance.
However, I certainly hope that this text can be useful for at least some people, e.g. those who accidentally have the same machine and configuration at home and want to evolve a little bit in the same direction. It's a lot of fun.
System 7.5.3 (19 parts).
Since one can never be sure of a successful installation of NetBsd, I also downloaded the Network Access Disk from Apple's website to prepare an emergency floppy (a very wise idea as it turned out, later):
Network Access Disk 7.5.
The following files are needed for NetBsd 1.5 / Mac68k (mac68k/binary/sets/):
For installing XWindows another bunch of files is needed: These files are needed to set-up NetBsd from inside Mac OS (mac68k/installation/misc/): Finally, I got some files from the Debian Linux-m68k distribution utilized to partition the hard disk:The installation guides recommend Apple's HD SC Setup tool, patched to recognize non-Apple drivers, for partitioning hard disks. However, it can re-arrange the partitions only by destroying all data on the disk.
I wanted to keep the original Mac OS system files, the application and document data of the Performa (which altogether occipied approximately 1,5GB). And because I did not want to copy the hard disk's contents to another space via ethernet or – even worse –, via AppleTalk (as noted above, there was no external storage device available), I had to find a way to initialize only one partition for NetBsd.
To do this, I set up Penguin, the Debian booter, according to the manual using the Linux kernel (the file called linux) and the ramdisk image (root.bin) included in the Penguin package. The following pictures illustrate all necessary settings:
fig.1: The necessary files in one window.
fig.2: The settings in the Penguin "Kernel" tab.
fig.3: The settings in the Penguin "Options" tab.
Then I invoked the booting process and after the screen was completely filled with system messages, the Debian menu appeared.
I directly chose the option "Alternate: Partition a Hard Disk" because that's what I actually wanted to do.
The menu disappeared and I got a command line shell running mac-fdisk. First, I wanted to take a look at the current partition map, so I typed in p after the prompt and got:
        # type name             length   base      ( size ) system
/dev/sda1 map  Apple                63 @ 1         ( 31.5K) Partition map
/dev/sda2 Dr43 Macintosh            54 @ 64        ( 27.0K) Driver 4.3
/dev/sda3 Dr43 Macintosh            74 @ 118       ( 37.0K) Driver 4.3
/dev/sda4 ???? Patch Partit        512 @ 192       (256.0K) Unknown
/dev/sda5 HFS  Wittgenstein   24462148 @ 704       (  2.1G) HFS
/dev/sda6 HFS  Popper         24462148 @ 244628    (  2.1G) HFS
Due to the 1024MB limitations of the installer, I decided to split up the first HFS partition ("Wittgenstein") into three new partitons:
The changed partition table was looking like that:
        # type name             length   base      ( size ) system
/dev/sda1 map  Apple                63 @ 1         ( 31.5K) Partition map
/dev/sda2 Dr43 Macintosh            54 @ 64        ( 27.0K) Driver 4.3
/dev/sda3 Dr43 Macintosh            74 @ 118       ( 37.0K) Driver 4.3
/dev/sda4 ???? Patch Partit        512 @ 192       (256.0K) Unknown
/dev/sda5 unix NetBsd Root     1843200 @ 704       (900.0M) Linux native
/dev/sda6 unix NetBsd Swap      131072 @ 1843904   ( 64.0M) Linux native
/dev/sda7 unix NetBsd User     2487871 @ 1974976   (  1.2G) Linux native
/dev/sda8 HFS  Popper         24462148 @ 244628    (  2.1G) HFS
It did not matter that the system entry of the unix partitions were called "Linux native". NetBsd was able to use all three properly.
After I was sure that the partition table is alright, I issued the command w to save the changes. I confirmed with y and the table was written. Then I quit with q and returned to the Debian menu. From there I simply had to reboot selecting the appropriate menu entry.
Now the hard disk was ready to for the Bsd file system...
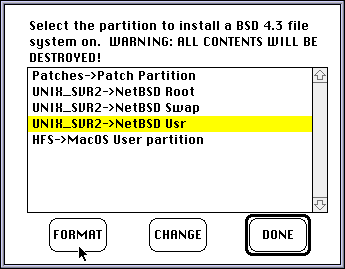
fig.4: Choosing a NetBsd partition to format.
Finally, after all packages have been installed, I let the installer program "Build Devices" choosing the appropriate command from the "File" menu.
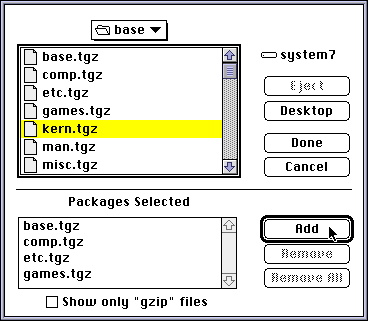
fig.5: Adding the base packages for installation.
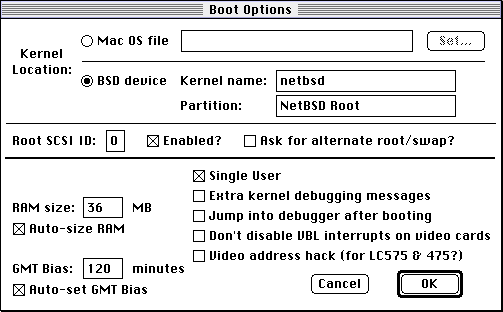
fig.6: Boot options in the NetBsd booter application.
And then the magical moment has come: I issued the "Boot Now" command, the booter application printed some final messages in the console window, and the screen turned blank:
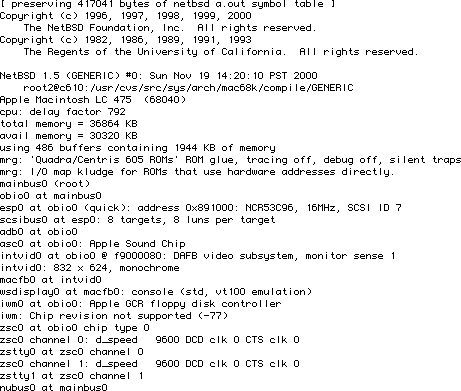
fig.7: First messages during the booting process (the full message text is available as text file created via a dmesg dump).
It all ended with the prompt
Enter pathname of shell or RETURN for sh:
Lucky me! Everything worked and after hitting the return key i was in the shell. From here I followed the instructions of the installation guide again. I entered the lines
I set the cursor on the "N" of the line rc_configured=NO and typed
The same system messages appeared on the screen, but this time NetBsd finally displayed the "Login:" prompt. At this time, there is only the "root" user available, so I typed root and hit return twice – no password needed, but I instantly changed this by typing:
However, I had to cope with the wrong keyboard layout, a hostile vi editor, a shell that bothered me and the internal clock running behind sooner or later.
I wanted to get a colon when typing one, not a bigger sign; I wanted to edit files as I used to do with pico, to use the command-line features available in bash. And I wanted to sync the internal time via the network time protocol.
To my disappointment, I had to give up my first efforts in configuring the keyboard. As it turned out, the NetBsd/mac68k 1.5 distribution does not support the wscons driver. That's why the measures described in section 4.3 of Federico Lupi's short guide did not work with my installation. And as it seems all the other options appeared too difficult to me at that time of my experience with NetBsd. Anyway, I was more lucky with the text editor. I used NetBsd's package collection to download and install pico:
pkg_add ftp://ftp.netbsd.org/pub/NetBSD/packages/1.5/mac68k/editors/pico-4.0.tgz
This was the entire step necessary to do for me, the rest was done by NetBsd. And afterwards I was freed from vi and became a happy pico user.
pkg_add ftp://ftp.netbsd.org/pub/NetBSD/packages/1.5/mac68k/shells/bash-2.05.tgz
After bash was installed successfully, I added the file .bashrc to my home directory /home/tobi including the following code I got from here:
## If we are not a login shell, source /etc/profile anyway
if [ "$0" != "-bash" ] ; then
    . /etc/profile
fi

## to add someting to your path, do something like the following
export PATH=${PATH}:${HOME}/bin:/usr/sbin:/usr/X11R6/bin

## set a happy editor for programs that want them
export EDITOR='pico'
export VISUAL='pico'

set history=40

## some usefull aliases, so new users don't hurt themselves
alias rm='rm -i'
alias cp='cp -i'
alias mv='mv -i'
alias ls='ls -F'
alias ll='ls -alF'

## this is to fool the automounter
cd ${HOME}

## my custom prompt
PS1='\u@\h:\w > '
Finally, I made bash my default shell by issuing chsh tobi and changing the line Shell: /bin/sh to Shell: /usr/pkg/bin/bash. A last time those steps are detailed here for vi, because after the next login pico will be the default editor:
tobi@pizzabox:~ > _
In /etc/rc.local I added the line
/usr/sbin/ntpd.
In /etc/ntp.conf I added
disable auth
server time.euro.apple.com
server swisstime.ethz.ch
server ntp.cesnet.cz
However, there is a software package called hfsutils that provides a set of special commands to mount, display, modify and transfer data from and to at least one Mac partition.
I installed it, again using the package system:
pkg_add ftp://ftp.netbsd.org/pub/NetBSD/packages/1.5/mac68k/sysutils/hfsutils-3.2.6.tgzFrom now on I was able to issue the following commands:
First of all, I generated the host keys:
/usr/sbin/sshdin rc.local. I also found a script that checks if ssh and the host keys are present, and only then starts sshd:
#
# Start sshd if present.
#
if [ -x /usr/local/sbin/sshd ]; then
# Try to generate missing keys
   if [ -x /usr/local/bin/ssh-keygen -a ! -f /etc/ssh_host_key ]; then
      (echo; echo -n "  (sshd: generating RSA key)...") >/dev/console
      /usr/local/bin/ssh-keygen -q -b 1024 \
         -f /etc/ssh_host_key -C '' -N '' >/dev/null
      chmod 600 /etc/ssh_host_key ; chmod 644 /etc/ssh_host_key.pub
   fi
   if [ -x /usr/local/bin/ssh-keygen -a ! -f /etc/ssh_host_dsa_key ]; then
      (echo; echo -n "  (sshd: generating DSA key)...") >/dev/console
      /usr/local/bin/ssh-keygen -q -d -b 1024 \
         -f /etc/ssh_host_dsa_key -C '' -N '' >/dev/null
      chmod 600 /etc/ssh_host_dsa_key ; chmod 644 /etc/ssh_host_dsa_key.pub
   fi
# No keys - then no startup.
   if [ -f /etc/ssh_host_key -o -f /etc/ssh_host_dsa_key ]; then
      /usr/local/sbin/sshd & echo -n " sshd"	>/dev/console
   fi
fi
I rebooted the Performa into Mac OS, started the installer application and simply added all the XWindows files for installation:
I went to sleep once more, and the next day the installation completed. Then I just issued startx and to my surprise I quickly was displayed three terminal windows and the legendary Unix clock!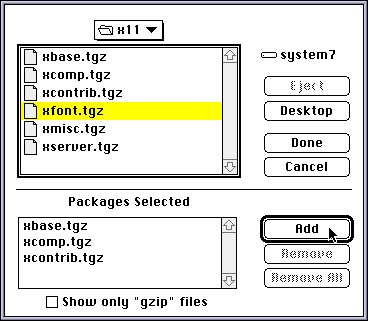
fig.8: Adding the XWindows packages for installation.
The mouse worked like a charm, the only disadvantage was the lack of two more mouse buttons, but who cares?
This day I tried out different settings for the window sizes and positions but soon noticed that system messages would always appear on top of all windows, being printed over the whole screen.
I found some advice as possible solutions for this problem. However, none of them should turn out to be working with this NetBsd installation. The only hope left is a customized kernel which means compiling it – and I am still not sure if me punce should dare that...
Anyway, at least I was proven that it's possible to use XWindows on the Performa 475. That it is actually not usable right now, is a minor misfortune I can live with. Especiall, since I can conntect via secure shell from a machine that has all the graphical user interface I need (and the keyboard layout suits much better, too).
Apache bravely is returning web documents, sometimes using Perl or Rebol for cgi processing and MySql is serving a test database used by a helma installation on another machine.
I also additionally configured different other services, e.g. the cron daemon using crontab to schedule a set of scripts that generate the list of recently updated websites at popo.at.
However, I wanted to spare me detailed descriptions of how I did all this because with NetBsd's package system is is a child's play at least to install the software.
The configuration of Apache or MySql might be more difficult, but if the official manual should not be sufficient, there is a whole bunch of third-party guides available online.
Will be a close shave between "never change a running system" and being annoyed by blind-typing and the mistakes that occur in doing so. XWindows isn't that important to me, anyway.
I probably will throw out the full Mac OS 7.5.3 installation and replace it with Erik Winkler's minisystem 7.1 – given that the Performa will run it.
It's certainly a challenge to make the system more secure, configure a firewall etc., as well as simply trying to learn as much about Unix administration. If I should ever bomb the system, it won't be a desaster. It's a cool little machine for practising Unix.